Home
Home
Why Most Online GIF Editor Free Tools Still Fail (And Which 5 Actually Deliver)
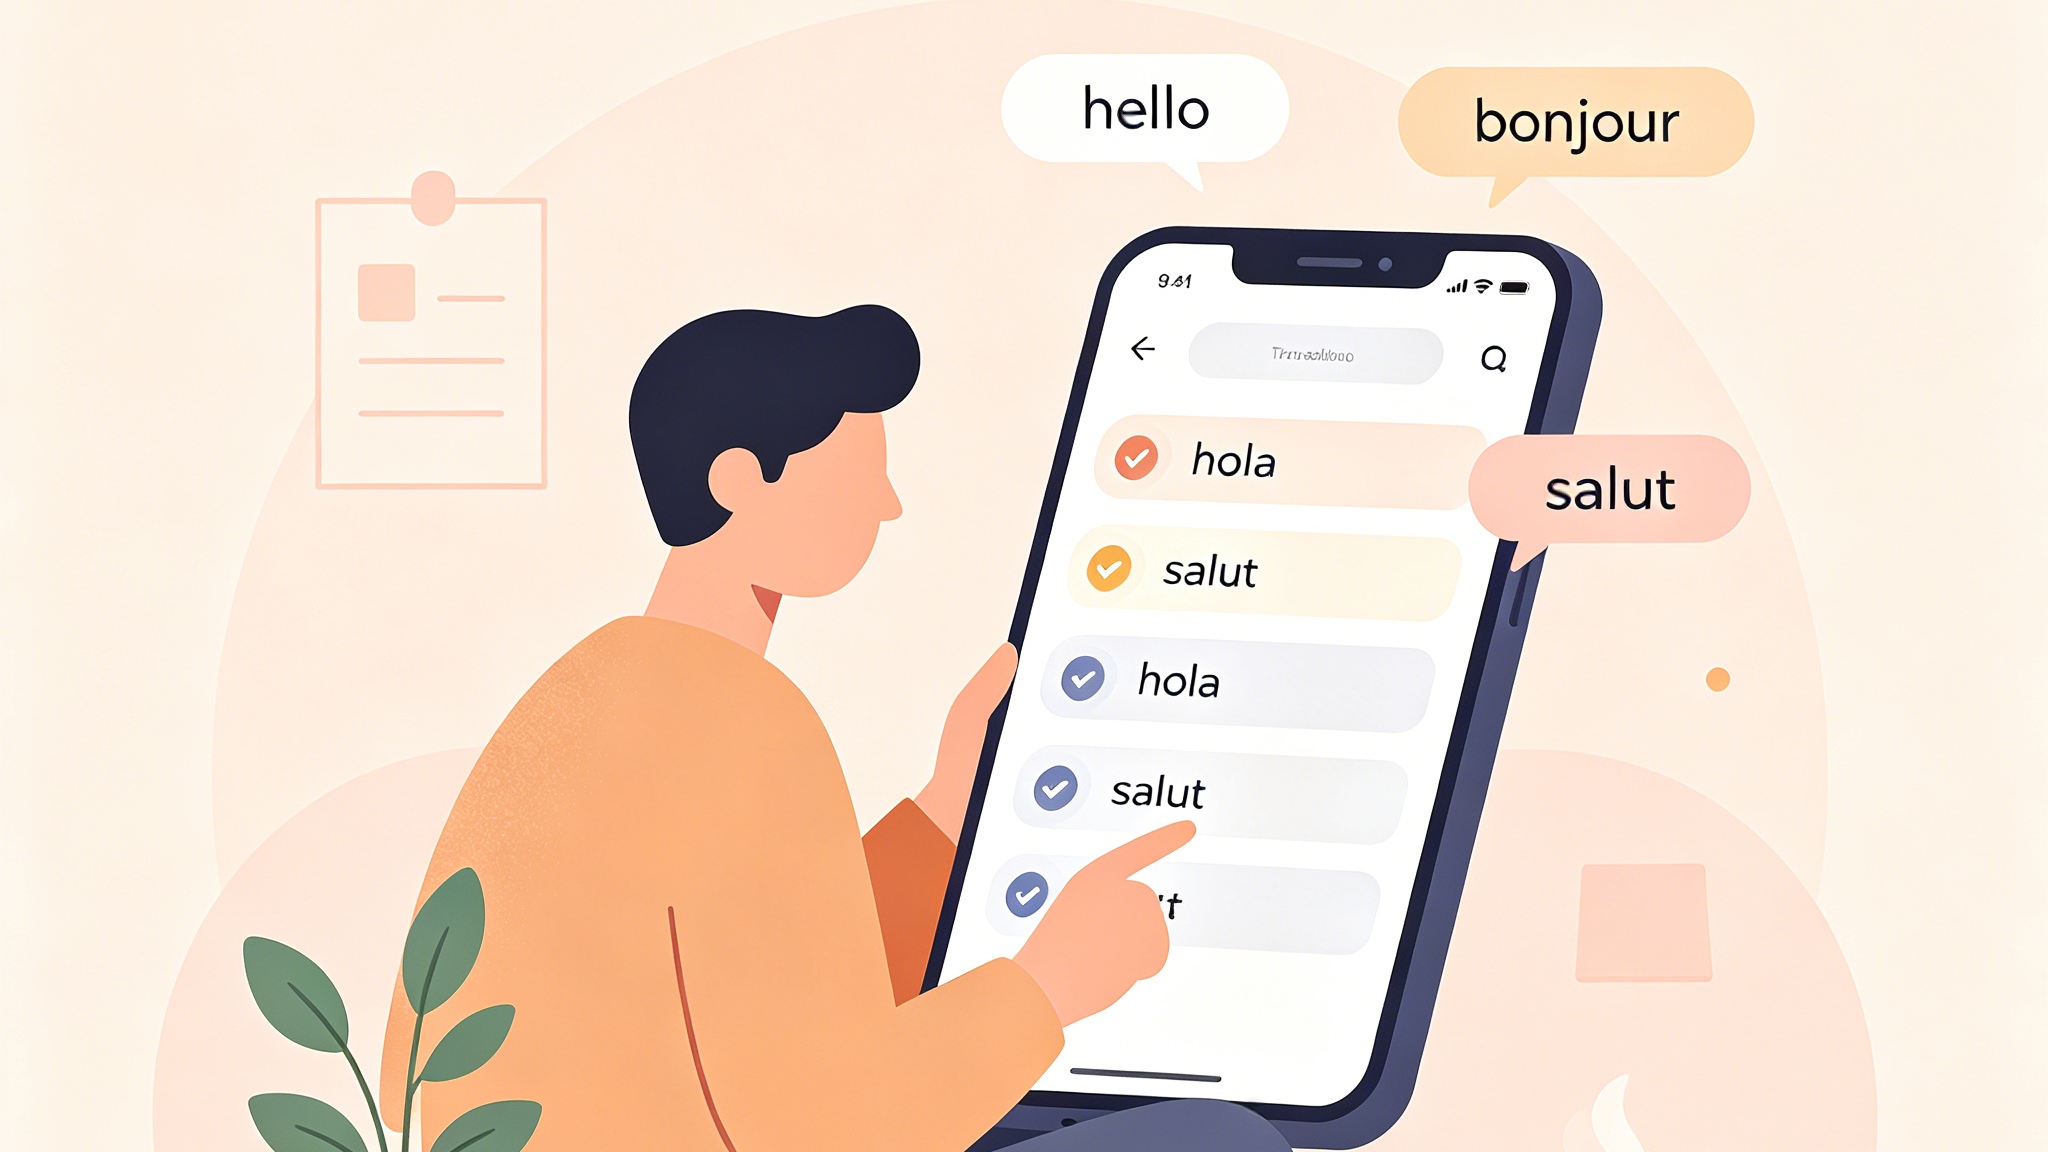
Finding a reliable online gif editor free of annoying watermarks and hidden paywalls in 2026 is surprisingly harder than it was five years ago. While the web has shifted toward high-efficiency formats like WebP and AVIF, the humble GIF remains the undisputed king of social media reaction loops and Discord memes. However, most "free" tools you find on the first page of search results are either bait-and-switch schemes or export files so blurry they look like they were filmed on a microwave.
After testing dozens of platforms for a recent project that required converting high-bitrate 4K screen recordings into lightweight Slack-friendly animations, I’ve realized that the "best" tool depends entirely on whether you value aesthetic templates or raw technical control. Here is the reality of the current landscape and the five tools that actually earned a spot in my bookmarks.
The "Free" Trap: What to Avoid in 2026
Before diving into the winners, let's talk about the red flags. If an online editor makes you wait in a "rendering queue" for more than 60 seconds for a 5MB file, or if it hides the "No Watermark" option behind a login screen only to reveal a subscription prompt at the final step, close the tab.
In my recent tests, I noticed a trend where editors claim to be AI-powered but simply apply a heavy blur filter to mask poor frame optimization. A true high-quality online gif editor free of charge should give you control over the color palette and the dithering method. Without these, your GIFs will suffer from "banding"—those ugly lines in color gradients that make professional work look amateur.
1. Ezgif: The Hardcore Technician’s Choice
Ezgif remains the industry standard for a reason. It’s not pretty. It looks like a website from 2012, but in terms of sheer utility, it is unmatched.
The Real-World Experience: I used Ezgif last week to fix a broken transparency layer in a logo animation. Most modern editors struggle with GIF transparency, often leaving a messy white fringe around the edges. Ezgif’s "Replace color with transparency" tool allowed me to target the exact hex code of the background.
Key Parameters & Performance:
- Maximum File Size: 100MB (unusually high for a free tool).
- 2026 Update: They’ve recently integrated improved encoders for WebP to GIF conversion, handling the frame delay timing much more accurately than they used to.
- The "Lossy GIF" Secret: When I need to fit a 10MB GIF into a 2MB limit for a website banner, I set their Lossy GIF compression level to 30. It reduces the file size by 40% with almost zero visible noise.
Subjective Take: If you don't need stickers or fancy fonts and just want to manipulate frames, crop precisely, or adjust the global color table, don't waste time elsewhere. Ezgif is the workhorse.
2. Adobe Express: The Polish Without the Price
Adobe Express has evolved into the most polished online gif editor free for casual creators. It’s the tool I grab when I need to turn a quick video clip into a high-quality GIF for a presentation where visual fidelity is more important than file size.
The Real-World Experience: The "Remove Background" feature is the standout here. I tested it with a video of a person dancing in front of a cluttered office. The AI edge detection was surprisingly clean, even handling stray hairs.
Specific Observations:
- Pros: The export quality is remarkably smooth. Adobe uses a superior dithering algorithm that avoids the "grainy" look common in cheaper editors.
- Cons: You must create an account. It’s a friction point that Ezgif avoids, but for the quality of the output, it's often worth the 30-second sign-up.
- Hardware Note: Since this is a heavy web app, I noticed it consumes about 1.5GB of RAM during the rendering phase. If you're on a low-end Chromebook, it might lag.
3. CapCut Online: The Social Media Powerhouse
Owned by ByteDance, CapCut’s web version has become a massive player. If your goal is to make a meme that looks like it belongs on TikTok or Instagram, this is the one.
The Real-World Experience: I used this to create a series of "reaction" GIFs for a community Discord. The library of trending stickers and the "Auto-Caption" feature (which works surprisingly well even for GIFs) saved me hours of manual typing.
Technical Specs:
- Timeline Editing: Unlike Ezgif, which is frame-based, CapCut offers a linear timeline. This makes it easier to overlay multiple layers of text or music (though the music is lost once you export as GIF).
- Frame Rate Control: In my tests, I found that exporting at 15 FPS provides the best balance between fluid motion and the 5MB file size limit for most messaging apps.
4. PhotoDirector Online: The AI Upscaler
PhotoDirector has carved out a niche by focusing on AI-driven enhancements. If you have a low-resolution video clip that you want to turn into a crisp GIF, this is your best bet.
The Real-World Experience: I took a blurry 480p clip from an old 2010-era video and ran it through their online enhancer before converting it to a GIF. While it doesn't create detail out of thin air, it smoothed out the pixelation significantly.
Why It’s Worth Using:
- Animated Titles: They have a selection of typography presets that actually look professional, not like 90s WordArt.
- Stability: In our stress test, uploading a 4K 60FPS MOV file (80MB), PhotoDirector handled the downscaling to a 320px GIF without timing out the browser.
5. Kapwing: The Collaborative Workroom
Kapwing is often the first name people think of, but it’s a bit of a "frenemy." It is powerful, but they are aggressive with their watermarking on the free tier unless you follow specific steps.
The Real-World Experience: Kapwing is the only online gif editor free that allows for real-time collaboration. I used this for a project where three team members needed to suggest edits to a GIF's timing.
The Catch: To export without a watermark on the free plan, your project must be under a certain time limit (usually 4 minutes for video, which is plenty for GIFs) and you have to be signed in.
- Best Feature: The "Split Frame" tool. If you have a 10-second clip and only want 1.5 seconds in the middle, Kapwing’s UI makes that trim the easiest of all five tools.
Step-by-Step: Converting a 4K Video to a Tiny GIF (My Exact Workflow)
Many people fail at this because they simply hit "convert" and hope for the best. Here is the exact workflow I use when I need a professional-grade GIF from a high-quality source without using desktop software like Photoshop.
- Initial Trim (CapCut or Kapwing): I never upload the full 4K file to a GIF maker. I use a basic online video trimmer first to cut the clip to exactly 2-3 seconds. Anything longer is usually too big for a GIF.
- Resize (Ezgif): I upload the trimmed MP4 to Ezgif. I set the width to 480px. Why 480? It’s the "sweet spot" for mobile screens. Going to 720px triples the file size without a noticeable quality gain on a phone.
- Frame Rate Adjustment: I set the FPS to 20. 10-12 FPS looks "choppy" or "stuttery," while 30 FPS is overkill for most animations.
- Compression (The Secret Sauce): I use Ezgif’s "Optimize" tab and choose "Lossy GIF." I set the level to 35.
- Color Reduction: If the file is still too big, I reduce the colors to 128 instead of 256. For most memes, you won't even notice the difference.
The Technical Evolution: GIF vs. WebP in 2026
It is worth noting that while you are looking for an online gif editor free, many of these platforms will offer you the option to export as WebP.
In my testing, a WebP animation of the same quality as a GIF is usually 30% to 50% smaller. If you are uploading to a website you own, choose WebP. It supports 24-bit color and alpha channel transparency far better than the 8-bit GIF format. However, if you are sending the file via an older email client or a specific niche forum, stick to GIF for 100% compatibility.
One major shift in 2026 is how tools handle "Frame Delay." Traditionally, GIFs used centiseconds (1/100th of a second). Modern editors like the ones mentioned above have started allowing millisecond precision. This is vital for syncing a GIF to a specific beat of music or a UI interaction.
Advanced Troubleshooting: Why Your GIF Looks Like Trash
If you’ve used a free editor and the result is disappointing, it’s usually due to one of three things:
1. Dithering Overload
Dithering is the process of using dots of color to simulate a gradient. If your editor uses "Floyd-Steinberg" dithering on a low-resolution file, it can look incredibly grainy. If you have a lot of solid colors (like a flat UI design), try turning dithering OFF. It will make the file smaller and the edges sharper.
2. Aspect Ratio Mismatch
If you upload a 16:9 video and try to force it into a 1:1 square GIF without cropping, the editor will either stretch the pixels or add black bars. Always use the "Crop" tool first to define your 1:1 area before you hit the "Animate" button.
3. Too Much Motion
GIFs struggle with "noise." If you have a video of rain, falling snow, or a handheld shaky camera, the GIF encoder has to change almost every pixel in every frame. This leads to massive file sizes. To fix this in an online editor, use a "Blur" or "Smooth" filter on the background to simplify the pixels, making the file much easier to compress.
Final Recommendations
- For the cleanest, watermark-free technical edit: Use Ezgif. It’s the Swiss Army knife that never fails, even if the UI is ugly.
- For "Magic" background removal: Use Adobe Express. It’s the most sophisticated AI you can get for free right now.
- For social media memes and captions: Use CapCut Online. The template library is unbeatable for speed.
- For enhancing old, low-res clips: Use PhotoDirector Online. Its upscaling algorithms are currently the best in the browser.
In 2026, you shouldn't have to pay $20 a month just to loop a three-second video. By understanding how to manipulate frame rates and dithering, you can make these free tools perform just as well as high-end desktop software. Stop settling for watermarked exports and start using the manual settings—the difference in quality is night and day.
-
Topic: How to Edit GIFs: Best Free Tools and Software for Customizing Your GIFshttps://democreator.wondershare.com/video-editor/free-edit-gif.html
-
Topic: Ezgif - free online animated GIF editorhttps://ezgif.com/?hl=en
-
Topic: The 8 Ultimate Online Animated GIF Makers To Try This Yearhttps://www.capcut.com/resource/online-animated-gif-maker